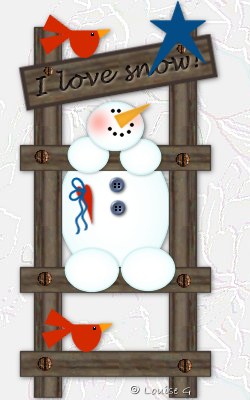
Snowman on a ladder.

I think he is climbing to reach the star.
Get the zip with the text and screw here.
Zip it up in your PSP Image Folder.
Start withhttps://berryb.xyz/pspvault/snowman%20ona%20ladder,%20tutorial%20made%20by%20Louise%20G._files/snowmanonaladder.zip a New Image 250 x 400, transp, 16 mill.
New Layer. Call it Stick1. Preset Shapes,
Rectangle.
Set Background to Pattern, Phone Pole. Angle 90. Foreground solid color #3F342F.
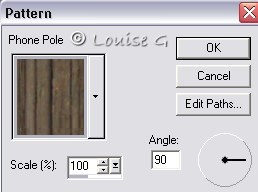
Make the stick 27 x 370.
![]()
Duplicate. Image, Mirror.
New Layer. Call it Step. Preset Shapes, the same settings as before, but change
angle to 0.
Make the step 190 x 25. Place it at the bottom of the ladder.
Duplicate two times and put the steps like
this.
Make the space between step two and three a little wider.
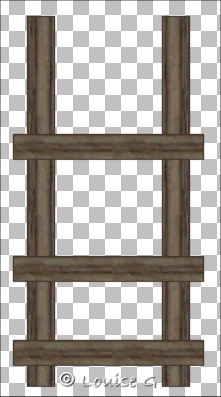
Layers Merge, Merge Visible. Call it Ladder.
New Layer. Call it Foot. Preset Shapes,
Ellipse.
Change Background to solid color. Set Foreground to color #D0F4F4
and Background to white color. Make an ellipse 53 x 43. Place it on step two.
Duplicate, Image, Mirror. Place the feet together on step two.

Close Layer Ladder. Layers, Merge, Merge Visible. Call it
Feet.
New Layer. Call it Hand. Preset Shapes. The
same settings as on Layer Foot.
Make en ellipse 40 x 35. Place it on step three. Duplicate. Image, Mirror.
Put the hands together.
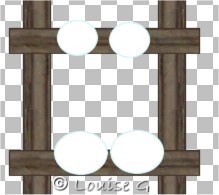
Close Layers Ladder and Feet. Layers, Merge, Merge Visible. Call it Hands.
New Layer. Call it Head. Preset Shapes. The
same settings as on Layer Foot.
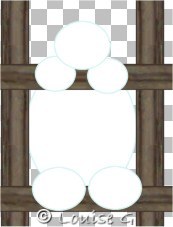
Make an ellipse 56 x 48. Place it on top of the hands.

New Layer. Call it Body. Preset Shapes. The
same settings as on Layer Foot.
Make an ellipse 110 x 135. Place it between the left and right sticks.
Drag this Layer under Layer Ladder in your Layer Palette.
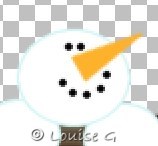
Stand on Layer Head. New Layer. Preset
Shapes, triangle.
Color #FEB12A on both Fore- and Background.
Make the nose 13 x 36. Turn it with Deformation Tool.
New Layer. Call it Eye. Preset Shapes, Ellipse. Fore- and Background black color.
Make the eye 3 x 3. Duplicate this layer six times and place the dots like this.
Close Layers Body, Ladder, Feet, Hands,
Head and Nose.
Layers, Merge, Merge Visible. Call it Dots.
Stand on Layer Head. Magic Wand. Click
outside the head. Selections, Invert.
Keep it selected. New Layer. Airbrush 2, color red. Make some red on the cheeks.

Effects, Blur, Gaussian Blur6. Deselect.
Stand on Layer Head again. Selections,
Select all. Selections, Float.
Effects, 3D, Cutout as below.
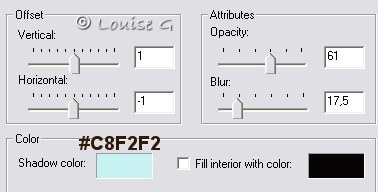
Deselect.
Stand on Layer Hands and do the same Cutout.
Deselect.
Stand on Layer Feet and do the same Cutout. Deselect.
Stand on Layer Body and do the same Cutout, but change Blur to 60. Deselect.
Stand on Layer Nose and do the Cutout as below.
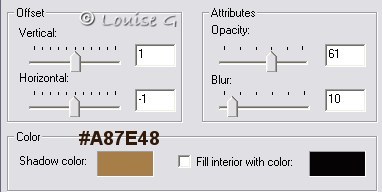
Deselect.
You can now decorate the snowman with some
nice things. I used buttons and a heart.
New Vector Layer. Call it Heart. Preset Shapes,
Heart 2. Check Create as vector.
Red color on both Fore- and Background. Make the heart 15 x 40.
Object Selector. Node edit. Left click on the marked node.
Drag the lower handle to your right and make a sligthly bent curve.
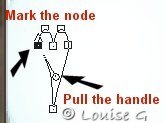
Right click outside the heart. Quit Node
Editing. Left click.
Right click on this heart layer in your Layer Palette and Convert to Raster
Layer.
Deformation Tool. Turn the heart a little and put it in place on the snowmans
body.
New Layer. Call it Loop. Draw, settings as below.
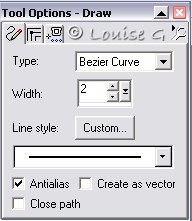
Get a color you like on your Foreground. I used a blue color. Background closed.
Make three clicks, where I have marked, and you will have a nice loop.

Duplicate and turn it with Deformation Tool. Put it in place. Effects, Sharpen
once.

New Layer. Call it Band. Draw, Single
Line2. Make a straight line 40 long.
Effects, Geometric, Wave as below.
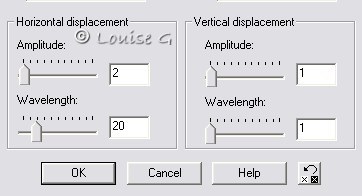
Put it on the loops. Duplicate. Image, Rotate 10 Right. Put it a bit lower than the first band.
![]()
New Layer. Call it Button. Preset Shapes. Button 51.
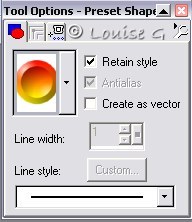
Make the button 15 x 15. Colors, Colorize,
Hue 155, Saturation 56.
Then you vill have a blue button. If you like another color just try different
settings.
New Layer. Black color. Airbrush, Round, size2. Make 4 holes in the button.

Close all layers except the button and hole
layers. Layers, Merge, Merge Visible. Call it Button.
Effects, 3D, Drop Shadow as below.
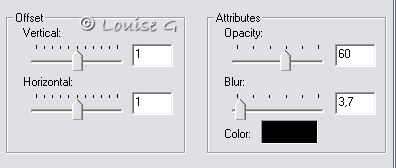
Duplicate the button. Put the buttons on the snowmans belly, under eachother.
Stand on Layer Heart and do the same Drop Shadow.
Stand on Layer Feet and do the same Drop Shadow.
Stand on Layer Hands and do the same Drop Shadow.
Stand on Layer Head and do the same Drop Shadow.
Layers Merge, Merge Visible. Call it Ladder.
New Layer. Call it Body. Preset Shapes,
Ellipse. Color red on both Fore- and Background.
Make an ellipse 30 x 45. Selection Tool, Rectangle, Antialias checked.
Mark on the upper part what you will delete.

Delete. Deselect.
New Layer. Call it Tail. Preset Shapes,
Triangle. Color red on both Fore- and Background.
Make the triangle 15 x 35. Deformation Tool. Turn the tail and put it in place.
Effects, Sharpen once.
Duplicate. Image, Flip. Put the other tail in place.

New Layer. Call it Beak. Preset Shapes,
Triangle. Color orange on both Fore- and Background.
Make the beak 8 x 12. Deformation Tool. Turn the beak. Put it in place.
Stand on layer Body. Airbrush3, black color. Make an eye.
Close Layer Ladder. Layers Merge, Merge
Visible. Call it Bird.
Place it on the first step.
New Vector Layer. Call it
Star. Preset Shapes,
Star 2. Check Create as vector.
Blue color on both Fore- and Background. Make the star 55 x 51.
Object Selector. Node edit. Left click on the marked nodes and drag them
downwards.
Make them not equally long.
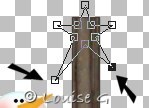
Right click outside the star. Quit Node
Editing. Left click.
Right click on this star layer in your Layer Palette and Convert to Raster
Layer.
Put the star on the upper part of the right stick.
Stand on Layer Ladder. New Layer. Call it
Sign. Preset Shapes,
Rectangle.
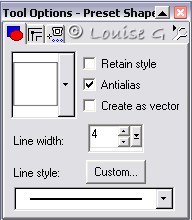
Set Background to Pattern, Phone Pole. Angle 0. Foreground solid color #3F342F.
Make the sign 190 x 40.
New Layer. Here you can write whatever you like on the sign.
If you like my text, copy and paste it as a New Layer. Look in the Layer Palett
and choose text.
Place it on top and in
the middle of the sign.
Close Layer Ladder, Bird and Star. Layers,
Merge, Merge Visible.
Call it Sign. Image, Rotate, Left10. Place the sign so the star won't block all
of the text.
Stand on Layer Bird. Duplicate and put the bird to your left on top of the sign.
Stand on Layer Copy of Bird. New Layer. Airbrush2, white color. Make a white dot on the birds eyes.
Get the rusty screw you got in the zip.
Copy and paste it as a New Layer.
Duplicate that screw 5 times and place them on the ladder, two on each step, one
at each end.
Resize the screw to 10 and copy and paste it as a New Layer.
Put the screw on the sign. Duplicate and put it at the other end of the sign.
Layers, Merge, Merge Visible. Save.
That was all there was to it. You are done now.
