Little angel with harp.
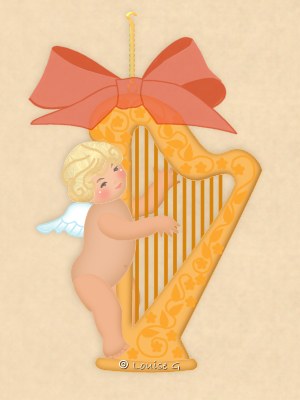
Heavenly music. The angel is playing for
you.
You will also need filter Eye Candy, but
you can do this tutorial without it also.
You can fill with the hairpattern included in the zip instead.
Get the Selections
here and zip them up in
your PSP Selections Folder.
The zip also includes a bow and the face, zip them up in your PSP Image folder and
a hairpattern, zip it up in your PSP Patterns Folder.
Save often!
Start with a New Image 300 x 400, transp,
16 mill.
New Layer. Call it Arm1. Selections, Load from disk, angelwharp, arm1.sel.
Flood Fill with color #F1B68F. Selections, Float. Effects, 3D, Cutout as below.

Deselect.
New Layer. Call it Leg1. Selections, Load from disk, angelwharp,
leg1.sel.
Flood Fill with color #F1B68F. Selections, Float. Effects, 3D, Cutout as before.
Deselect.
New Layer. Call it Strings. Selections, Load from disk, angelwharp,
strings.sel.
Flood Fill with color #D7830B. Deselect.
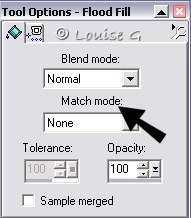
A small tip is to set your Tool Options Palette like this befor you flood fill.
Set Match Mode to None. That way you will fill all the selections with one click.
Smart, isn't it?
New Layer. Call it Harp. Selections, Load from disk, angelwharp,
harp.sel.
Flood Fill with color #FABB60. Selections, Float. Effects, 3D, Cutout as before,
but set the Opacity to 100. Deselect.
New Layer. Call it Lines. Selections, Load from disk, angelwharp,
lines.sel.
Flood Fill with color #FBA72F. Deselect.
New Layer. Call it Leaves. Selections, Load from disk, angelwharp,
leaves.sel.
Flood Fill with color #FBA72F. Deselect.
New Layer. Call it Flowers. Selections, Load from disk, angelwharp,
flowers.sel.
Flood Fill with color #FBA72F. Deselect.
New Layer. Call it Harpbottom. Selections, Load from disk, angelwharp,
harpbottom.sel.
Flood Fill with color #FABB60. Selections, Float. Effects, 3D, Cutout as before,
but set the Opacity to 64. Deselect.
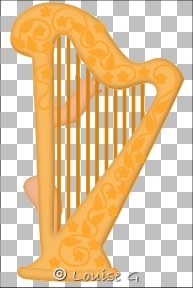
This is what you will have now.
Layers, Merge, Merge Visible. Call it Harp.
Let's do the chain.
New Layer. Get your Text tool. Click
somewhere in your picture.
Make the settings like this.
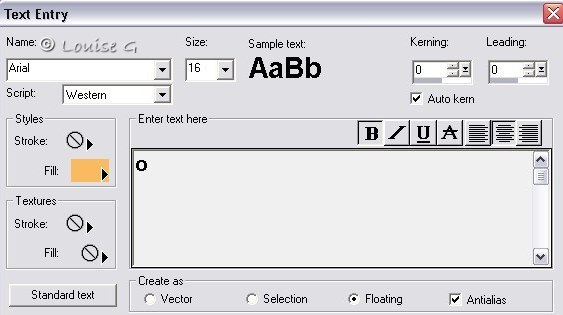
Type the small letter o. That will be the ring to the hanger. Deselect.
New Layer. Text tool. Make an 8. Size 10.
Duplicate 5 times. Now you will have six 8.
Put them on top of eachother and on top of the ring.
New Layer. Make a questionmark, size 16.
Eraze the dot under it. Image, Mirror.
Put it on top of all the 8.
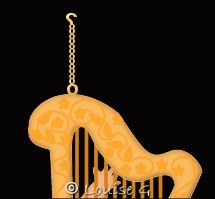
Close Layer Harp.
Layers, Merge, Merge Visible. Call it Chain.
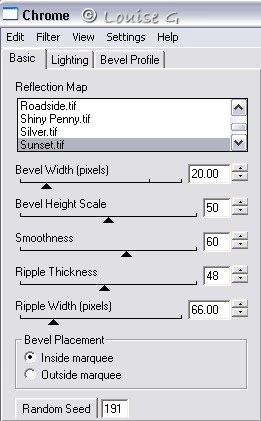
Eye Candy, Crome, Sunset as below.
New Layer. Call it Wing. Selections, Load from disk, angelwharp,
wing.sel.
Flood Fill with color #BEE8EF. Selections, Modify, Contract by 2. Flood Fill
with white color.
Selections, Float. Effects, 3D, Cutout as on Harpbottom, but change color to
#6BC6D3. Deselect.
New Layer. Call it Wingpart. Selections, Load from disk, angelwharp,
wingpart.sel.
Flood Fill with color #B4E7EE. Deselect.
New Layer. Call it Body. Selections, Load from disk, angelwharp,
body.sel.
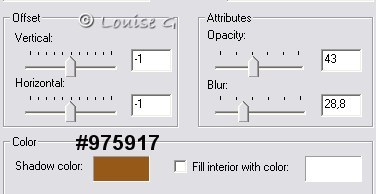
Flood Fill with color #EEBD9C. Selections, Float. Effects, 3D, Cutout as below.
Deselect.
New Layer. Call it Bellybutton. Selections, Load from disk, angelwharp,
bellybutton.sel.
Flood Fill with color #D69C76. Deselect.
New Layer. Call it Leg2. Selections, Load from disk, angelwharp,
leg2.sel.
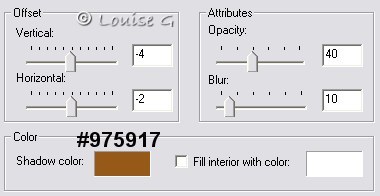
Flood Fill with color #F1B68F. Selections, Float. Effects, 3D, Cutout as below.
Deselect.
New Layer. Call it Toes. Selections, Load from disk, angelwharp,
toes.sel.
Flood Fill with color #EDAC81. Deselect.
New Layer. Call it Arm2. Selections, Load from disk, angelwharp,
arm2.sel.
Flood Fill with color #F1B68F. Selections, Float. Effects, 3D, Cutout as before,
but change Opacity to 25. Deselect.
New Layer. Call it Head. Selections, Load from disk, angelwharp,
head.sel.
Flood Fill with color #EEBD9C. Selections, Float. Effects, 3D, Cutout as below.
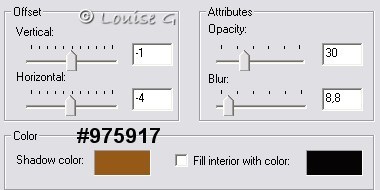
Deselect.
Get the face you got in the zip. Copy and
Paste it as a New Layer. Call it Face.
Place it like this.

New Layer. Call it Hair. Selections, Load from disk, angelwharp,
hair.sel.
Flood Fill with color #F5E5AF. Eye Candy, Swirl as below.
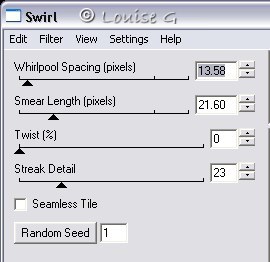
Or you can fill with the pattern
you got in the zip, then you won't need Eye Candy.
Selections, Float. Effects, 3D, Cutout as below.
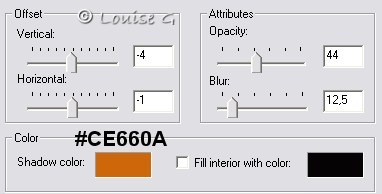
Deselect.
New Layer. Call it Haircurls. Selections, Load from disk, angelwharp,
haircurls.sel.
Flood Fill with color #EBC888. Deselect.
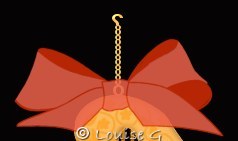
Get the bow you got in the zip. Copy and
Paste it as a New Layer. Call it Bow.
Place it on the chain, like this.
Stand on Layer Head. Colors, Adjust, Brightness/Contrast. Set Brightness to 10.
Layers, Merge Merge Visible and all is done.
